DDEV: Easy Docker handling for web developers

What is DDEV?
DDEV is an open-source tool that simplifies Docker. It streamlines how you configure and use Docker for web development with just a few commands and a config file.
TL;DR: Who is it for?
If you're already confident with your web development setup and
already using Docker comfortably, this may not add much value for you.
But if you don't use Docker yet, don't know where to start, or want to speed things up, read on.
DDEV lets you focus more on your code and less on DevOps.
DDEV vs Docker
DDEV uses Docker and provides a simplified way to manage web development environments. In practice, using DDEV means using Docker with better defaults.
For developers with little experience creating or running Docker containers directly, DDEV provides an easy start and unlocks Docker benefits without deep setup work.
A major advantage of DDEV for teams and agencies is its lean config.yaml, which can be committed per project so everyone works with the same setup.
You can do this with plain Docker too, but DDEV makes it easier by consolidating key settings in config.yaml. For teams, this reduces setup and maintenance overhead.
What DDEV includes
DDEV covers almost everything web developers need in daily work:
Web server: nginx-fpm or apache-fpm
PHP: versions 5.6 to 8.4
Node.js: via nvm, with .nvmrc support
Databases: MariaDB 5.5–11.8, MySQL 5.5–8.4, PostgreSQL 9–18
DB tools: phpMyAdmin, Sequel Ace, TablePlus, DBeaver, HeidiSQL
Email testing: Mailpit
Add-ons: Redis, Elasticsearch, Solr and more
Debugging: Xdebug integration
Performance: Mutagen for fast file synchronization
So far, I have not hit practical limits with DDEV.
Why use DDEV instead of plain Docker?
Using plain Docker for web development usually means either using a pre-built image or building one yourself.
If you don't have special requirements and mainly need PHP, Apache, and MySQL, you can save time by using DDEV instead of reinventing the wheel.
And it gives you even more:
PHP 5.6–8.4, Node.js via nvm with .nvmrc support
DB tools: Sequel Ace, TablePlus, DBeaver, HeidiSQL, phpMyAdmin
Local SSL support
Redis via
ddev add-on get ddev/ddev-redisElasticsearch via
ddev add-on get ddev/ddev-elasticsearchProject sharing via
ddev share(ngrok)
Why DDEV instead of Laravel Sail or Laravel Herd?
Although I mostly work on Laravel projects, I prefer DDEV because it is not Laravel-specific and works across web stacks. I can run almost anything with it. For example, spinning up a WordPress project is straightforward. Learning one tool instead of several validates the choice for me.
How to get started with DDEV
Install Docker and DDEV
If you don't have Docker installed, follow these steps first.
After that, complete the Docker post-installation steps.
Finally, head to the DDEV installation manual and take all the required steps.
Verify your installation with
ddev -v.Add DDEV to an existing project
To run an existing project with DDEV, go to the project root directory and run
ddev configto start initialization. It prompts for a few project details. Then start the project withddev start. You should be able to reach the project in your browser.
How to configure Xdebug to work with DDEV
To use Xdebug with DDEV, set it up once. Whenever you want to debug, start the session with ddev xdebug. When you're done, stop it via ddev xdebug false.
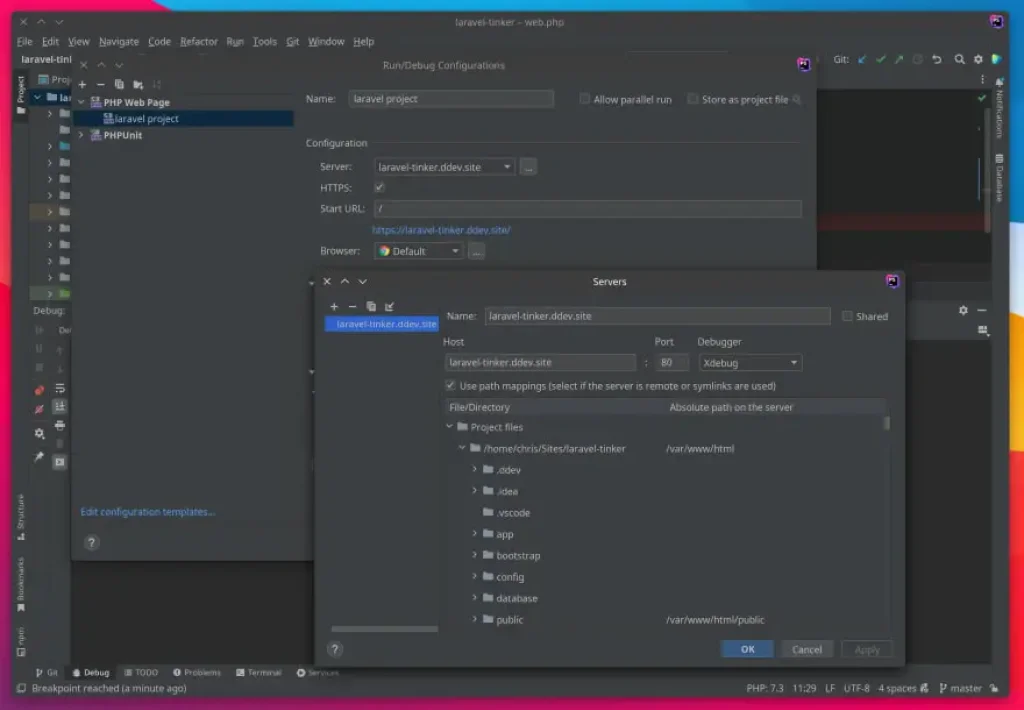
Configure Xdebug to work with DDEV and PhpStorm
To make Xdebug work in PhpStorm, configure path mappings in your project debug settings. For example, if your projects are in ~/Sites/, add a mapping from ~/Sites/laravel-tinker/ to /var/www/html.
Go to Run > Edit Configurations and Add a new Configuration. Here is a screenshot of a working configuration.
Configure Xdebug to work with DDEV and VS Code
The setup process for VSCode is very easy. Go to the DDEV documentation and download the provided config snippet.
If you run into issues, check with ddev xdebug status for the current state. Default port is 9003. Find the latest troubleshooting tips in the debugging documentation.
New! There is an extension that lets you control DDEV settings from the VS Code interface.
DDEV Cheatsheet: The most important commands
These are the commands I use most often in daily work. You can find more commands here.
# Initialize project
ddev config
# Start/stop containers
ddev start
ddev stop
ddev restart
ddev poweroff # Stop all DDEV resources
# Open project in browser
ddev launch
ddev launch -m # Open Mailpit
# Project info
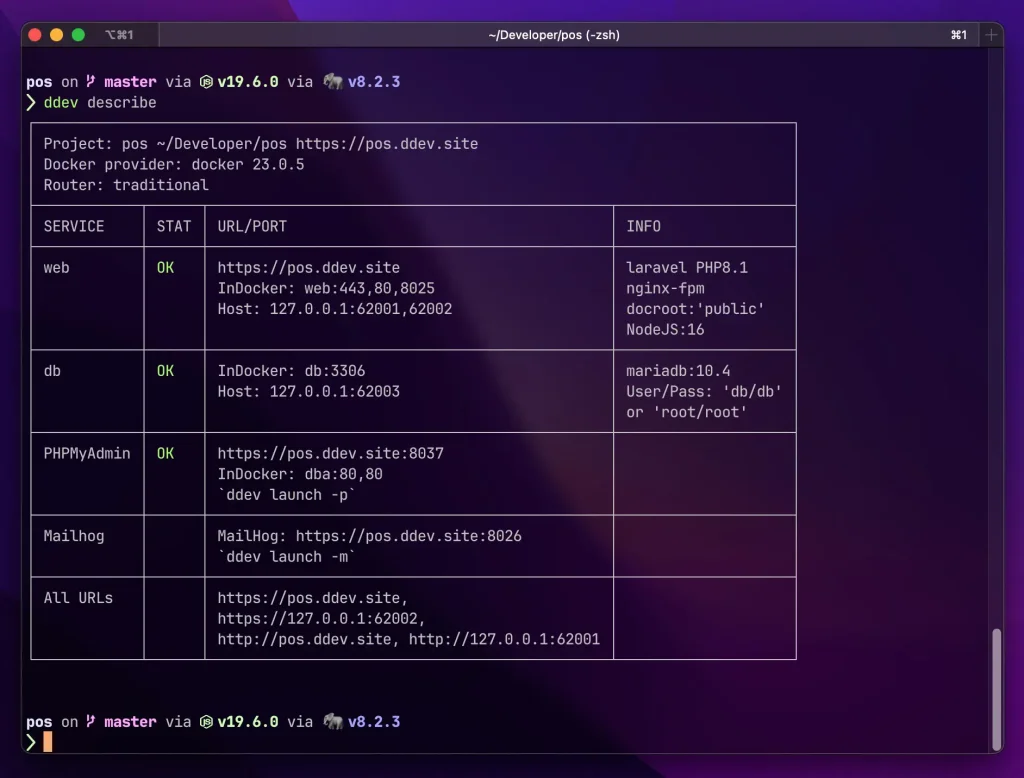
ddev describe
ddev list # List all projects
# Shell in container
ddev ssh
ddev exec <command>
ddev exec npm run dev
# Database
ddev mysql # MySQL/MariaDB CLI
ddev psql # PostgreSQL CLI
ddev sequelace # Open Sequel Ace (macOS)
ddev tableplus # Open TablePlus
ddev export-db > dump.sql.gz
ddev import-db < dump.sql.gz
ddev snapshot # Quick DB snapshot
ddev snapshot restore # Restore snapshot
# Change database type
ddev delete # Caution: Deletes all data!
ddev config --database=mysql:8.4
ddev start
# SSH auth for remote access
ddev auth ssh
# Framework-specific commands
ddev artisan <command> # Laravel
ddev composer <command> # Composer
ddev npm <command> # npm
ddev yarn <command> # Yarn
# Debugging
ddev xdebug on
ddev xdebug off
ddev xdebug status
# Install add-ons
ddev add-on get ddev/ddev-redis
ddev add-on get ddev/ddev-elasticsearch
ddev add-on listLanguage:bashHow to define a custom command
DDEV makes it easy to define custom commands. In most projects, I use a custom command called "provision" for setup instructions. It bundles all required setup steps. A practical example is shown in my article Adding a second database for testing with DDEV.
# .ddev/commands/web/codequality

#!/bin/bash
## #ddev-generated
## Description: Ensure code-quality
## Usage: codequality
## Example: "ddev codequality"

cd frontend
node_modules/.bin/eslint --ext .js,.vue --fix --ignore-path .gitignore --max-warnings 0 .

## run cs-fixer
vendor/bin/php-cs-fixer fix

## run tlinter
vendor/tightenco/tlint/bin/tlint

## run phpstan
vendor/bin/phpstan analyze -c phpstan.neon

composer outdated --ansi -D -m --strictLanguage:bash
Enable two DDEV projects to communicate
Okay, until here, all the stuff was pretty basic. Let's tackle something more interesting. Say, we have multiple projects which we're working on, e.g. an API service that we need to call from another app.
You can start both projects with DDEV and work on them. By default, however, they cannot reach each other. To enable this, use custom services and define the address where each project is exposed. Read more about this feature in the DDEV documentation.
To make a project accessible for other projects, define a yaml-file like this:
# .ddev/docker-compose.router.yaml
services:
  web:
    external_links:
      - ddev-router:taskdoc.ddev.siteLanguage:bash